RTL-SDR is a good addition to the arsenal of any hardware geek and this holds true for hardware security researchers too. Recently I did a talk at HITB Amsterdam (http://www.slideshare.net/yashinm/sniffing-the-airwaves-with-rtl-sdr) where I explained how the RTL-SDR was useful and how it can be leveraged for security applications. With this blog post I intend to demonstrate how the RTL-SDR can be used to sniff 433 Mhz transmitters. These are pretty cheap and can be found in a lot of appliances including alarm sensors. This post is also intended to be an intro to RTL-SDR usage. I suggest you get Kali linux (1.0.6>) on your system as it has most of the dependencies required for this demo.
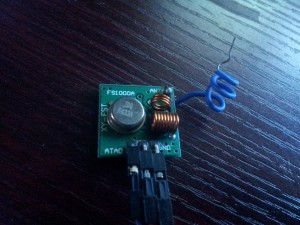
To show the capture of data and to simulate a transmission I’ll be using a FS1000A 433 mhz transmitter along with a Teensy to control it. These use ASK modulation.
The code I used to transmit “1″ every 2 seconds:
#include <VirtualWire.h>
char *controller;
void setup() {
 pinMode(13,OUTPUT);
vw_set_ptt_inverted(true);
vw_set_tx_pin(2);
vw_setup(4000);
}

void loop(){
controller="1" ;
vw_send((uint8_t *)controller, strlen(controller));
vw_wait_tx();
digitalWrite(13,1);
delay(2000);
digitalWrite(13,0);
delay(100);
}
Initially to check whether the transmitter is working correctly I used gqrx (https://github.com/csete/gqrx). It’s a SDR receiver implemented in GnuRadio and is very useful for tracking down and recording signals. The following spike is obtained every two seconds:
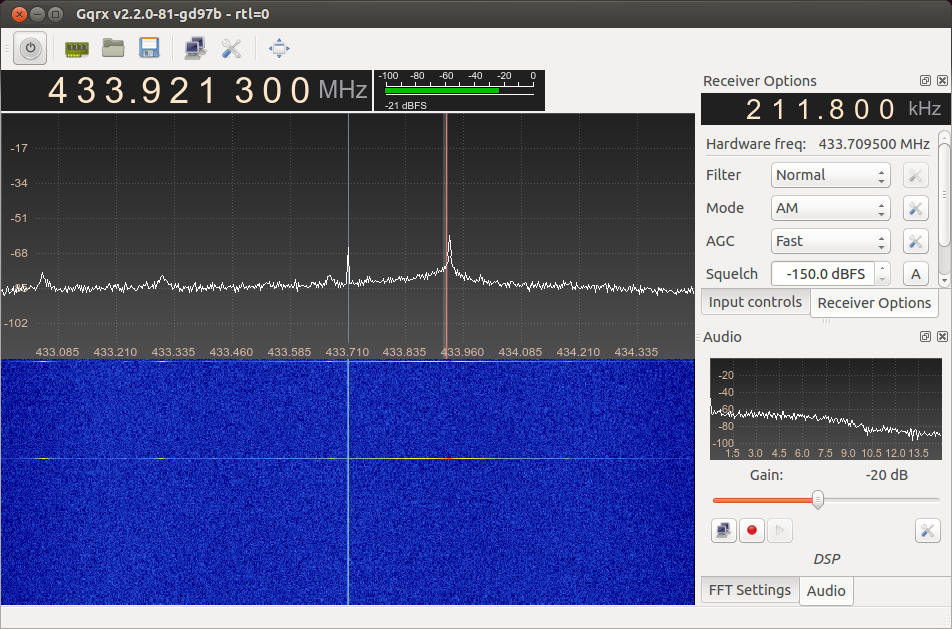
This tells us that the transmitter is working fine . To get a good look at the signal being generated we can use rtl_sdr combined with baudline (http://www.baudline.com/download.html). rtl_sdr is a tool that comes with the rtl-sdr package (rtl_sdr is the tool and rtl-sdr is the collection. For more info: http://sdr.osmocom.org/trac/wiki/rtl-sdr). It outputs raw I/Q data. Baudline is another useful tool that can be used to visually understand signals. The following command will pipe the output of rtl_sdr to baudline for analysis:
rtl_sdr -f 433920000 -s 1000000 – | baudline -reset -samplerate 1000000 -channels 2 -format u8 -quadrature -stdin
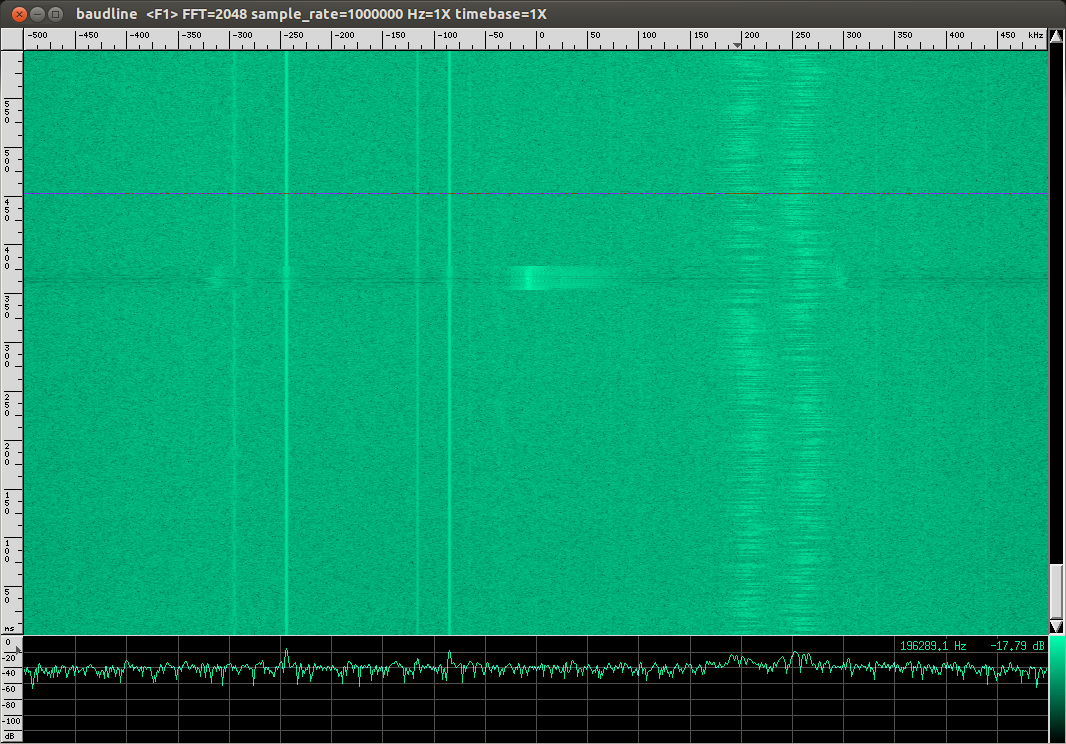
In most cases baudline can help you determine which modulation the transmitter is using and can be a good addition to gqrx and other receivers.
Another tool that we haven’t touched yet (at least not directly) is GnuRadio. Any serious work with software defined radio will probably include GnuRadio as it has support for a large number of devices such as the HackRF, RTL-SDR, USRP and the Funcube dongle. GnuRadio works with a block architecture: signal sources, converters, amplifiers and more are all blocks. Devices from which there’s an output of data is known as sources and blocks to which there’s only input are known as sinks. The source block for RTL-SDR gets installed when you install the rtl-sdr block. I’m using GNURadio 3.7 on Ubuntu.
To get started, open up GNU Radio Companion and from the Source section drag the “RTL-SDR” Source to the main work area.

Double click on the newly created source and set frequency as 433920e3 (433.92 Mhz). Change the variable block samp_rate on the right so that it’s value is 96e3 (96k). Since we need to hear the transmissions we’ll need an audio sink. Choose Audio Sink from the Audio section and drop it into the work area. In the sample rate section of the sink enter “int(samp_rate)”.
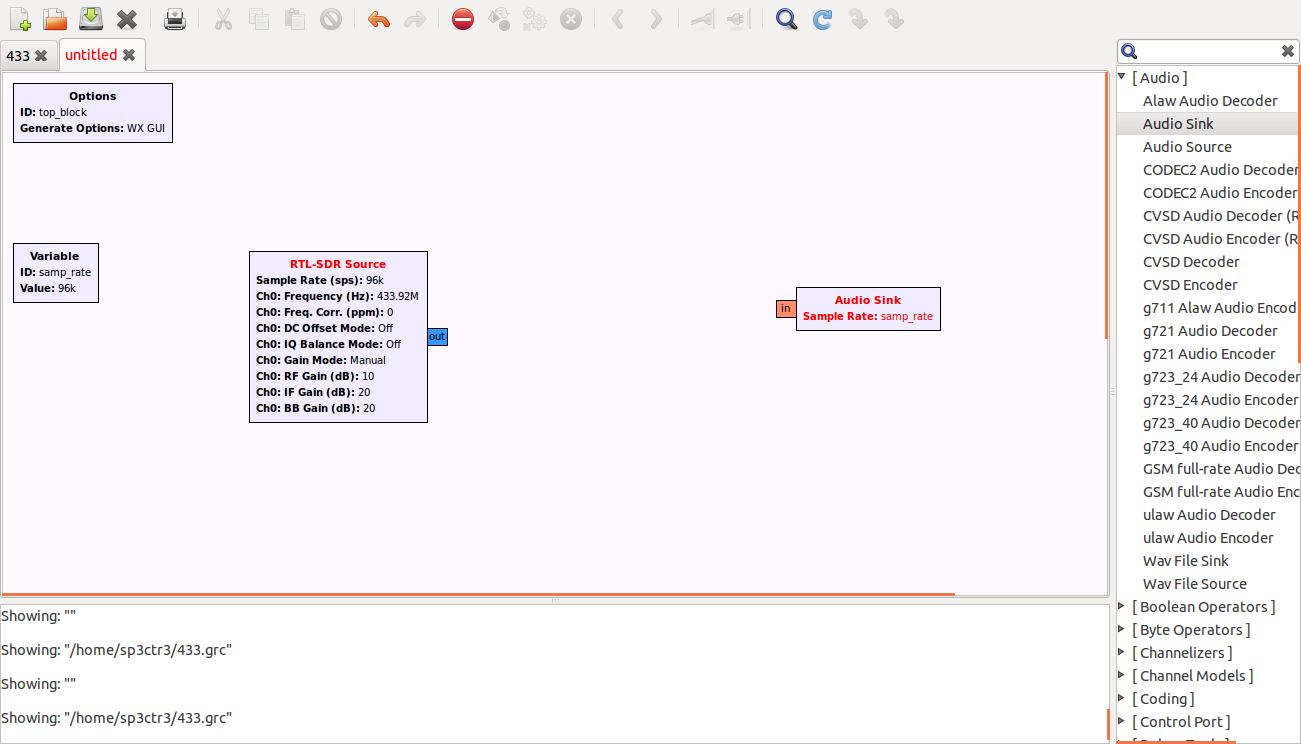
There’s a slight problem as the output of the RTL-SDR source is a complex data type and the Audio Sink accepts real datatype. GNURadio has you covered for this too! Choose a complex to real convertor from the Type Convertor section.

Join the blocks by clicking on the Out of the source and then the In of the Complex to Real convertor. Do the same for the sink. Click on the Execute button on the top of the GRC and you’ll begin to hear small pips of data every two seconds.
Now that we can access the audio stream through GRC we’ll also need to see the actual signal wave. To see the peaks in radio traffic we’ll use a FFT sink and for saving to file, a wav file sink. Make sure you set the filename that you want to save to and the bits per sample as 8. Your GRC graph should look like this:


You can open up the file in Audacity and see the signal wave in it:

Note:Sometimes when you open up audacity you’ll notice that there’s no signal in it. This happens because when a flow graph is terminated suddenly, the wav block may not write to the file correctly. For this purpose we’ll add a dropdown box that’ll allow you to switch between the file and /dev/null. Once the recording is done you should switch to /dev/null before closing. This will ensure that the file has been written properly.
Here’s how file choosing was implemented:

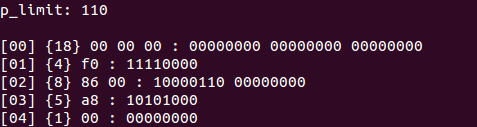
However since this is a 433 mhz transmission we already have a very easy to use tool by merbanan (https://github.com/merbanan/rtl_433) that actually converts the radio signals back to data. As the transmissions aren’t from any weather station or temperature sensor we will have to run rtl_433 with the analyse option set. It can be clearly seen that the data exists after a sequences of “0″s.
rtl_433 -a
If we change the transmission from the Arduino to a “2″ instead of “1″ we get:

Stay tuned for more posts on radio hackery!